When the lights go out, a portable generator can be a lifeline. But connecting it to your home's electrical system without the right safeguards is incredibly dangerous. That’s where a Generator Interlock Kit Installation Guide becomes your indispensable resource. It’s the roadmap to ensuring your generator powers your home safely, without risking deadly backfeeding into the utility grid.
This comprehensive guide, crafted by an expert, demystifies the process, making it accessible whether you're a homeowner looking to understand the system or a licensed electrician seeking a robust installation checklist. We'll walk you through everything from critical pre-installation planning to the precise steps of wiring and testing, ensuring your family stays safe and powered when outages strike.
Quick Look: What You'll Learn to Power Safely
- What an Interlock Kit Is: A mechanical safeguard to prevent dangerous backfeeding.
- Why It Matters: Essential for safety and compliance when using a portable generator.
- Pre-Installation Steps: Permits, load calculations, generator choice, and panel assessment.
- Step-by-Step Installation: A detailed guide for licensed electricians, covering wiring, mounting, and testing.
- Safe Operation: How homeowners can confidently use their generator setup.
- Crucial Warnings: Avoiding hazardous practices like "backfeed cords."
- Code Compliance: Understanding NEC requirements and the role of permits.
Why a Generator Interlock Kit is Your Home's Best Friend for Backup Power
Imagine the power goes out, and you quickly roll out your trusty portable generator. You want to power your fridge, maybe the furnace, and a few lights. But connecting that generator directly to your home's main electrical panel without a proper safety device is akin to playing Russian roulette with electricity. That's where a generator interlock kit steps in, offering a brilliantly simple yet profoundly effective solution.
An interlock kit is a budget-friendly and less invasive alternative to an automatic transfer switch (ATS) for portable generators. Rather than replacing your entire service panel or adding a large, dedicated transfer panel, the interlock kit integrates directly with your existing main service panel. Its core function is a sliding metal plate that physically prevents the main utility breaker and the new generator breaker from being on at the same time. This mechanical lockout is your absolute guarantee that your home will never simultaneously draw power from the utility grid and your generator. The result? No dangerous backfeeding of electricity onto the utility lines, which could electrocute utility workers or cause damage to your home and generator. It's a reliable, UL-listed device that brings peace of mind and NEC compliance to your backup power plan.
Before the Wrench Turns: Essential Pre-Installation Planning
Successfully installing a generator interlock kit isn't just about turning screws and stripping wires; it begins long before with meticulous planning. This foundational stage ensures safety, compliance, and optimal performance for your backup power system.
Securing Your Permit & Inspection Approval
Think of a building permit as your official green light. Before any electrical work begins, you must obtain an electrical permit from your local building department. This usually involves submitting detailed installation instructions for the interlock kit and a "Scope of Work" outlining your project. Why bother? Because after your installation is complete, an electrical inspector from the local Authority Having Jurisdiction (AHJ) will review your work to confirm it meets the National Electrical Code (NEC) standards, specifically Article 702 for optional standby systems, and ensures overall safety. Always verify that your specific interlock kit is approved for use in your state or municipality beforehand; not all kits are universally accepted. Skipping this step can lead to fines, dangerous installations, and headaches down the road.
Mapping Your Power Needs: The Load Calculation
This is where you become the energy detective. Performing a thorough load calculation (NEC Article 220) is crucial to understanding exactly what you need to power during an outage. Don't try to run your entire house; that's rarely practical or necessary for a portable generator. Instead, identify essential circuits: the refrigerator, a few lights, the furnace fan, maybe a well pump, or a critical medical device. For optional standby systems (NEC 702.4(B)(1)), this calculation focuses solely on these selected essential loads.
Grab a pen and paper, walk through your house, and list every appliance and light you deem critical. Note their wattage if possible (often found on a label). This calculation will directly inform the size of the generator you need and, crucially, the size of the generator breaker and associated wiring.
Choosing Your Backup Beast: Generator Selection
With your load calculation in hand, you’re ready to select a generator that matches your needs. Are you looking at a powerful Predator 13000 watt model, a quiet propane unit, or perhaps a solar-powered option? This decision is pivotal.
Consider the differences between traditional gensets and inverter generators. Inverter generators often provide cleaner power (stable frequency and voltage), which is better for sensitive electronics. Remember, interlocks are almost exclusively for portable generators. Automatic standby units (like Generac) use proprietary automatic transfer switches, which are different beasts entirely. Aligning your generator's output with your calculated essential loads prevents overloading and ensures efficient operation.
Finding the Right Fit: Sourcing Your Interlock Kit
This isn't a one-size-fits-all purchase. Your interlock kit must be specifically designed and UL-listed for the brand and model of your panelboard. Look for markings on your main electrical panel to identify its manufacturer (e.g., Square D, Eaton, Siemens, GE) and model number. Many manufacturers offer OEM (Original Equipment Manufacturer) interlock kits tailored to their panels.
If you have an older or less common panel and an OEM kit isn't available, some third-party interlocks exist, but their use might require additional scrutiny from your AHJ and must still be UL-listed for your specific panel series. Never try to force a generic kit onto an incompatible panel; the mechanical interlock must function flawlessly. For a deeper dive into everything you need to know about these essential devices, you might find our guide on all about generator interlock kits quite helpful.
Safety First, Always: Gear Up for Success
Working with electricity, especially inside your main service panel, demands extreme caution. This is not the time to cut corners on safety. Before you even think about opening that panel cover, ensure you have:
- Proper Tools: Insulated screwdrivers, a reliable multimeter, wire strippers, torque wrench.
- Personal Protective Equipment (PPE): Eye protection, electrical-rated gloves, and steel-toe boots are non-negotiable.
- Preparation: Tie back long hair, remove all jewelry (rings, watches, necklaces) – metal conducts electricity.
If at any point you feel uncomfortable working with live electrical parts, or if you're not absolutely confident in your electrical knowledge, stop. Hire a licensed professional. Your life, and the safety of your home, are worth it.
Getting to Know Your Panel: A Pre-Op Assessment
Before you open anything up, conduct a visual inspection of your main electrical panel.
- Identify Critical Circuits: Confirm the essential circuits you’ve identified in your load calculation are clearly marked and easily accessible.
- Available Spaces: You'll need an empty double-pole breaker space for your new generator breaker. These are often located in the top right section of the panel, as interlock kits are frequently designed to work with the main breaker located at the top. Ensure you have at least 2-3 contiguous spaces available, depending on your panel type and the specific interlock kit instructions.
- Panel Condition: Check for any signs of damage, corrosion, or previous shoddy work. Address these issues before proceeding with the interlock installation.
The Pro's Playbook: Step-by-Step Interlock Installation (for Licensed Electricians)
This section details the precise steps for installing a generator interlock kit. While homeowners can follow along to understand the process, this work must be performed by a licensed electrician to ensure safety, code compliance, and correct functionality.
Step 1: The Golden Rule – De-Energize and Lock Out
This is the most critical step. Your life literally depends on it.
- Turn off the Main Breaker: Locate your main circuit breaker within your service panel and switch it to the "OFF" position.
- Shut Off Upstream Disconnect: Go to your electric meter or external service disconnect (often a pull-out or breaker outside). Turn this off.
- Lock Out, Tag Out (LOTO): Attach a lockout device and a "Danger - Do Not Operate" tag to the service disconnect. This physically prevents anyone from accidentally re-energizing the system while you're working.
- Verify with a Multimeter: Never assume power is off. Using a multimeter, carefully test for voltage inside the panel:
- Phase-to-phase (between the two main hot bus bars).
- Phase-to-neutral (between each hot bus bar and the neutral bar).
- Phase-to-ground (between each hot bus bar and the ground bar).
- Confirm all readings are 0 volts.
Only proceed when you are absolutely certain the panel is de-energized.
Step 2: Gently Unveil Your Panel's Secrets
With power confirmed off, carefully remove the dead front, which is the inner cover that protects you from directly touching energized components. Most dead fronts are held on by several screws around their perimeter. Keep these screws organized; you'll need them later.
Step 3: Welcoming Your Generator Breaker
Now it’s time to install the heart of your generator connection within the panel: a new double-pole generator breaker.
- Location: Following the interlock kit instructions, install this breaker in an empty space, typically in the top right positions of the panel, adjacent to the main breaker. This placement is crucial for the interlock plate to function correctly.
- Ampacity: The breaker's ampacity (e.g., 30A or 50A) must match both your generator's output and the wiring gauge leading to your power inlet box. A 30A circuit typically uses #10 AWG wire, while a 50A circuit requires #6 AWG wire.
- Breaker Retainer Strap: Since this is a "back-fed" breaker (meaning it's feeding power into the panel rather than just drawing from it), NEC 408.36(D) requires a breaker retainer strap or a listed method to secure it. This prevents the breaker from accidentally coming loose from the bus bar, even if the panel cover is removed. Ensure this strap is installed as per the manufacturer's instructions.
Step 4: Securing the Brains: Mounting the Interlock
With the generator breaker in place, turn your attention to the interlock plate itself.
- Attach to Cover: Following the manufacturer's guide, attach the sliding interlock plate to the panel cover. This usually involves drilling a few small holes in the cover and securing the plate with provided screws.
- Positioning: Ensure the plate is precisely positioned to slide over the main utility breaker and the new generator breaker.
- Mechanical Test: Before re-installing the cover, manually test the interlock's mechanical function. Slide the plate to ensure it physically blocks one breaker from being switched on when the other is engaged. It should move smoothly and definitively prevent simultaneous operation.
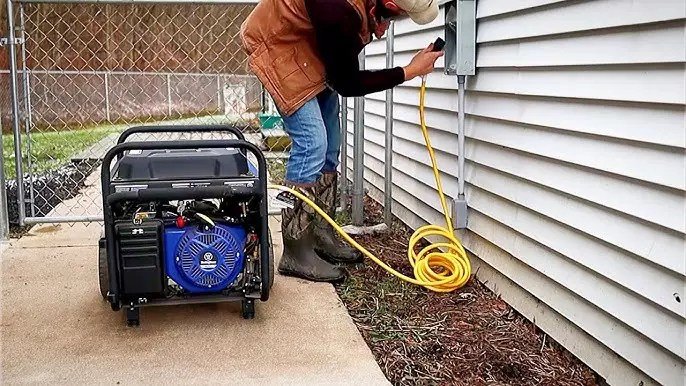
Step 5: Setting Up Your Power Gateway: The Inlet Box
The power inlet box is your home’s outdoor connection point for the portable generator. Proper placement and wiring are paramount for safety.
Choosing the Perfect Spot
Mount the weatherproof generator inlet box on the home’s exterior. Choose a location that is:
- Convenient: Easy for the portable generator to reach with its power cord.
- Safe from Exhaust: Crucially, it must NOT be near any windows, doors, or inside the house (garage included) due to the deadly carbon monoxide fumes produced by generators. Maintain adequate distance from all openings.
- Accessible: Easily accessible for connection but somewhat out of direct foot traffic.
Wiring It Right: From Inlet to Panel
- Conduit/Cable Selection: Run the appropriate gauge wire from the inlet box location to your main service panel. For a 30A circuit, you'll typically use #10 AWG wire (e.g., 10/3 with ground Romex cable or individual conductors in conduit). For a 50A circuit, you'll need #6 AWG wire (e.g., 6/3 with ground Romex or individual conductors in conduit).
- Protection: Ensure the wiring is adequately protected, either within appropriate conduit (EMT, PVC, or liquid-tight flexible conduit for outdoor runs) or as a listed cable assembly that meets NEC requirements for outdoor generator inlets. Stay updated on 2023 NEC rules for these installations, as codes can evolve.
- Penetration: Drill a hole through your exterior wall large enough for the cable or conduit.
Making the Connections
- Seal the Opening: After pulling the wire through the penetration, seal it completely with duct seal or a similar weatherproof caulk to prevent air, moisture, and pests from entering your home.
- Inlet Box Connection: Strip back the outer jacket of the cable. Push a Romex connector (e.g., a button-type connector for 10/3 cable) through one of the knockout holes in the inlet box (typically 1/2" trade size, ~7/8" actual diameter). Secure it tightly with the locknut.
- Wire Termination: Connect the individual wires to the corresponding terminals in the inlet box:
- Black (Hot 1) to L1
- Red (Hot 2) to L2
- White (Neutral) to N
- Bare Copper (Ground) to the green ground screw.
- Ensure all screw terminals are torqued to the manufacturer's specifications.
Mounting It Securely
Attach the inlet box firmly to your house using appropriate fasteners. For wood or vinyl siding, #8 or #10 sheet metal screws usually suffice. For masonry, use plastic anchors with #12 sheet metal screws. Ensure the box is level and the cover can be securely closed.
Grounding for Safety
The bare copper ground wire (e.g., #10 AWG) from your cable must be connected to the green ground screw within the inlet box. This provides a critical safety path for fault currents.
Step 6: Connecting the Inlet to the Generator Breaker
Now, run the other end of the wire you pulled from the power inlet box into your main service panel.
- Route Neatly: Route the wire neatly within the panel, keeping it away from sharp edges and other components.
- Terminate Wires:
- Connect the black wire and the red wire to the two terminals on your newly installed double-pole generator breaker.
- Connect the white neutral wire to the neutral bus bar.
- Connect the bare copper ground wire to the ground bus bar.
- Torque Connections: Use a torque screwdriver or wrench to ensure all connections are tightened to the manufacturer's specified torque settings. Loose connections are a common cause of electrical failures and hazards.
Step 7: Clarity is King: Labeling Your Setup
NEC has strict labeling requirements, and for good reason. Clear labeling prevents confusion and promotes safe operation.
- Generator Breaker: Clearly label the generator breaker on your panel schedule or directly on the dead front as "GENERATOR INLET" or "GENERATOR MAIN."
- Instructional Labels: Apply all instructional labels included with the interlock kit to the panel cover. These labels typically outline the proper sequence of operation, reminding the user to turn off the main breaker before engaging the generator, and vice-versa. Read and follow these instructions meticulously.
Step 8: The Final Seal & Interlock Test
- Re-install Cover: Carefully place the panel dead front back on and secure it with all original screws.
- Test the Interlock: Before restoring power, perform one last mechanical test of the interlock mechanism. Ensure you cannot turn on the main utility breaker and the generator breaker simultaneously. They must physically block each other.
- Restore Power: Once you are confident everything is correctly installed and secured, remove your LOTO device and restore power at the upstream service disconnect. Then, flip your main utility breaker back to the "ON" position.
Powering Up Safely: Your Guide to Operating Your Generator with an Interlock
Once the interlock kit is professionally installed and inspected, operating your portable generator safely becomes a straightforward, step-by-step process.
The Safe Start-Up Sequence
Follow these steps precisely to ensure you always prevent backfeeding and operate your system safely:
- Turn Off Branch Circuit Breakers: Go to your main electrical panel and turn off all the individual branch circuit breakers. This prevents an immediate surge of load when the generator starts and allows you to prioritize which circuits to power.
- Turn Off the Main Utility Breaker: Flip the main circuit breaker (the large one, usually at the top) to the "OFF" position. This physically disconnects your home from the utility grid.
- Slide the Interlock and Turn On the Generator Breaker: Slide the interlock plate into position over the now-off main breaker. This will unlock the generator breaker. Turn the generator breaker to the "ON" position.
- Connect and Start the Generator: Outside your home, connect your portable generator to the power inlet box using the appropriate generator cord. Start your generator according to its manufacturer's instructions. Allow it to warm up for a minute or two.
- Gradually Turn On Essential Branch Circuit Breakers: Return to your main panel. One by one, switch on only the essential branch circuit breakers you identified during your load calculation. Monitor your generator's load indicators (if available) to avoid overloading it.
Important Operational Notes
- Generator Placement: Always operate your generator outdoors, in a well-ventilated area, far from windows, doors, and vents to prevent carbon monoxide poisoning.
- Fueling: Never refuel a hot or running generator. Allow it to cool down first.
- Shutdown: To shut down, reverse the process: turn off all branch circuit breakers, then turn off the generator breaker. Shut down the generator. Disconnect the generator cord. Finally, slide the interlock back, turn the main utility breaker back on, and then gradually turn on your essential branch circuits.
Expert Insights: Critical Considerations for Professionals
For licensed electricians, staying current and understanding the nuances of generator installations is part of the job. Here are key points to keep in mind.
Staying Ahead of the Code: NEC Updates
The electrical code is a living document, constantly evolving to improve safety and integrate new technologies. Always consult the latest edition of the National Electrical Code (NEC), specifically 2023 NEC requirements for interconnection, transfer equipment (Article 702), and generator emergency stop rules. Familiarize yourself with local amendments too, as some jurisdictions adopt modified versions of the NEC or have additional requirements. Your AHJ is your primary resource for local code specifics.
Navigating Diverse Generator Types
While this guide focuses on traditional portable generators, be aware that solar-powered or inverter-based generators may have different connection requirements. If a client intends for such systems to operate in parallel with the utility (i.e., feeding power back into the grid, even temporarily), they must comply with NEC Article 705, which has much more stringent requirements for interconnected power production sources. An interlock kit, by its nature, prevents parallel operation with the utility, ensuring only one source is active at a time.
The Peril of Backfeeding: A Non-Negotiable Warning
This cannot be stressed enough: Never attempt to connect a portable generator to your home’s electrical system using a "backfeed cord" plugged into an appliance receptacle (like a dryer or range outlet). This practice, often called "suicide cords," is incredibly dangerous and illegal. It bypasses all safety mechanisms, risking:
- Electrocution: Sending electricity onto utility lines, potentially killing utility workers.
- Fire: Overloading circuits and wiring, leading to electrical fires.
- Damage: Destroying your home's electrical system and the generator itself.
An interlock kit is the only safe and legal way to connect a portable generator to your home's main panel. Educate your clients thoroughly on this critical safety distinction.
Common Questions About Generator Interlock Kits
Even with a detailed guide, a few questions often pop up. Here are concise answers to some common inquiries.
Can I install an interlock kit myself?
While the concept is straightforward, the actual installation involves working inside a live main electrical panel, which carries significant risks. Unless you are a licensed electrician with experience in panel work and a thorough understanding of electrical codes, it's strongly recommended to hire a professional. This ensures safety, compliance, and correct functionality.
How does an interlock kit differ from an automatic transfer switch?
An interlock kit is a manual, mechanical device for portable generators that prevents the main and generator breakers from being on simultaneously. An automatic transfer switch (ATS) is typically part of a permanent standby generator system; it automatically detects a power outage, starts the generator, and switches your home's power source without any manual intervention. ATS units are generally more expensive and complex.
What size generator breaker do I need?
The generator breaker's ampacity must match your generator's output and the wiring gauge connected to your power inlet box. For example, a 30A generator will typically use a 30A double-pole breaker and #10 AWG wire, while a 50A generator will use a 50A double-pole breaker and #6 AWG wire. This size is determined by your load calculation and generator specifications.
Are interlock kits universally compatible?
No, they are not. An interlock kit must be specifically designed and UL-listed for your particular brand and model of electrical panel. Attempting to use an incompatible kit is unsafe and will not be approved by an inspector. Always verify compatibility before purchasing.
Why are permits and inspections so important?
Permits and inspections ensure that the electrical work meets safety standards (like the NEC) and local codes. This protects your home and family from electrical hazards, validates your insurance, and prevents costly rectifications later if the work is found to be non-compliant. It also safeguards utility workers from backfeeding.
Your Next Steps to Secure Home Power
Installing a generator interlock kit is a significant step toward energy independence and peace of mind during outages. It's a testament to responsible homeownership, ensuring that your backup power solution doesn't pose a risk to your family or community.
If you've gained a clearer understanding of the process, your next move is to gather your load calculation, research compatible interlock kits for your panel, and most importantly, consult with a qualified, licensed electrician. They can confirm your plan, secure the necessary permits, and execute the installation safely and according to code. Don't let the next power outage catch you unprepared—or worse, unsafe. Make the call, get it done right, and enjoy the reliable, safe power an interlock kit provides.